Using a Hammer if you are Blind or Low Vision
Using a hammer to drive in nails – as well as for many other jobs – is certainly doable with low vision or no vision. Some people imagine bruised or broken fingers that result from hammering, but this is not the case; in fact, many persons who are blind or have limited vision use a hammer in many ways.
This guide will focus on using a hammer to drive in nails, but a hammer can be used for many other tasks, such as tapping a wood chisel or breaking up cement. As with any home repair or woodworking project, it is important to follow good safety practices and select the correct hammer and nails for the job.
Safety Practices for Hammering
- Consider the steps you will need to take to complete the project.
- Select the tools and materials you will need.
- Keep your work area organized and free of clutter.
- Wear safety glasses, closed-toe shoes, and snugly-fitting clothing to prevent your sleeves from getting caught up in your work.
- Place the tools and hardware you will need for your task in a nearby tool tray, tool belt, or another container so they are readily available to you.
- Keep unneeded tools and materials placed elsewhere, away from the work area.
- Do not begin a project if you are tired, frustrated, or have been consuming alcohol.
You can find additional safety and organization tips at Home Repairs Safety and Preparation Checklist.
Tips for Using Low Vision Effectively
If you have low vision or some residual vision and feel safe relying on it, here are some helpful tips:
- Select overhead lighting and/or movable tabletop lamps with flexible arms or floor lamps on wheels. For more information on the different types of lighting that are available, see Lighting and Glare.
- Position your work to take the best advantage of natural light if it is helpful. If it is not helpful or causes glare, block the source of outside light.
- Wrap a strip of colored electrical tape around the hammer head to help you see it and follow its movements. Most hammers are steel, which usually appears dark; wrap the hammer head with a contrasting tape color, such as white, yellow, or red.
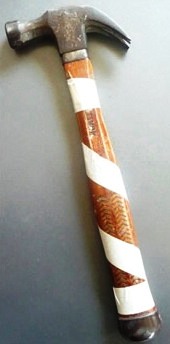
- Wrap contrasting-colored plastic or electrical tape around your tool handles (pictured at left) to make them easier to see and to increase contrast with the work surface.
- You can place a colored dot on the nail head and remove it when you’ve finished hammering.
Selecting the Best Hammer for the Job
There are many types of hammers on the market, ranging from small, lightweight “tack” hammers, to framing hammers, to heavier hammers usually used to remove concrete or wooden beams.
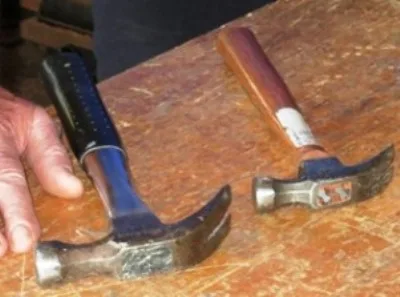 A 16-ounce hammer (left) and a tack hammer (right)
Most have claws (either straight or curved) opposite the hammerhead, which are useful for pulling out nails and prying up boards.
A tack hammer and a standard 16-ounce hammer (pictured below) will be adequate for most home repair projects.
Tip: Steel handles are preferable to wooden ones. Wooden handles can break if stressed. Also, wooden handles can dry out, which can cause the hammer head to fly off during use.
Selecting the Right Nail for the Job
There are many different types of nails, as anyone knows who has gone to a hardware store or building supply center. Nail sizes can range from small ½ inch “tacks” to 16-penny nails used for framing.
“Finishing nails” come in various lengths and have a small head that can be driven in slightly below the surface of the wood with a tool called a “nail set” or “nail setter,” where it can be concealed with wood putty. “Box nails” have larger nail heads and are used when exposure to the head doesn’t matter.
Tip: select the nail of the correct length and diameter for the project you are doing, and pick the hammer of the best size and weight to accomplish the task before you begin.
Techniques for Hammering Nails with Blindness or Low Vision
There are many techniques that people have devised to drive nails. Here are several tips and suggestions that you can choose to match your strength, spatial memory, and task to be performed.
Positioning the Nail
First, you will need to position the nail and hold it until you have driven it in enough that it will stay in place without being held. You can:
- Hold the nail with the thumb and first finger.
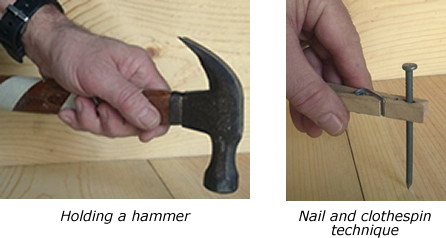
- Hold the handle nearer the hammer head (pictured below) for better control.
- Hold the nail with needle-nose pliers.
- Hold the nail with a spring-loaded clothespin (pictured below).
- Try holding the nail closer to the nail head, rather than against the board surface. If you strike your fingers with the hammer, they will be knocked aside rather than “crunched” against the board.
- Fasten a magnet to the end of a board to hold the nail in place until it is started.
- Make a notch at the corner of a wood block to hold the nail upright.
- Use a thick piece of cardboard that you can push the nail through.
- Drill a pilot hole slightly smaller than the diameter of the nail to hold the nail straight and true. For more information about drilling adaptations, see Using Power Tools to Saw and Drill.
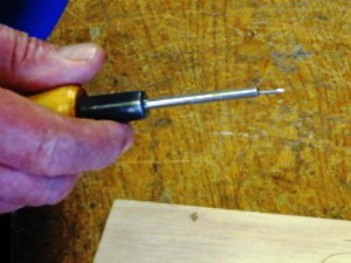
You can also start short nails with a small head with a spring-loaded brad starter:
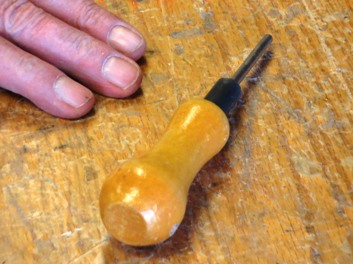
Step 1: The brad starter tool
Step 2: Insert a nail into the hollow shaft of the brad starter.
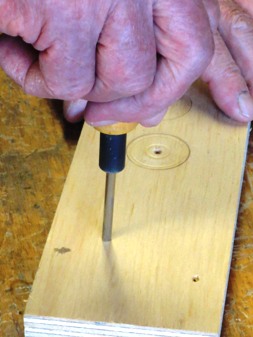
Step 3: Push the spring-loaded shaft of the
brad starter against the piece of wood.
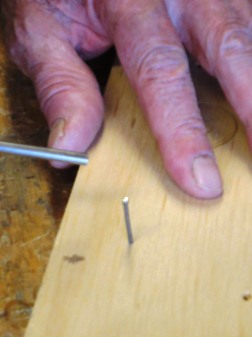
Step 4: The nail tip is inserted into the wood.
Tip: When nailing softwood or hardwood, it is advisable to drill a pilot hole part way into the wood to prevent cracking and to help with starting the nail. Plywood or medium-density fiberboard (MDF) usually doesn’t crack or split.
Tip: If you hold the nail with your fingers, try to hold the nail at a right angle to your work to ensure it will go in straight.
Locating the Nail
Once the nail is started there are several ways to locate the nail before striking it with the hammer:
- Two-Stroke Hammering Technique: Using this method, you can strike the nail with two strokes: the first is a tap to locate the nail head and the second is a driving stroke. The resulting sound pattern will be “tap-bang, tap-bang” rather than “bang, bang, bang.”
- Lightly touch the side of the nail head with your index finger to locate it, and then remove your finger before striking the nail.
Tip: Try to hold the hammer so that the head of the hammer is parallel to the nail and strikes the head with the face of the hammerhead. This will help ensure the nail will not bend or go in at an angle.
You may discover that after some experience at driving nails, your muscle memory will help you strike the nail correctly with each stroke without having to check it. Also, you can tell by sound and feel if you have an excellent driving stroke or if the nail is bending or is not being struck flatly by the face of the hammer.
Tip: Once the nail is started, grasp the hammer handle near the end so that the weight of the hammer, along with flexing your wrist, will do the work of driving the nail – not your arm or shoulder.
Pneumatic Nailers and Nail Guns
Compressed air-driven nail guns, also called pneumatic nailers, can fit all sizes of nails and can make easy work of nailing. They require a source of compressed air – usually 70 to 90 pounds per square inch (PSI) – and a nail gun that matches the size and type of nail you wish to install. They all have safety devices, but care must be taken to avoid accidents.
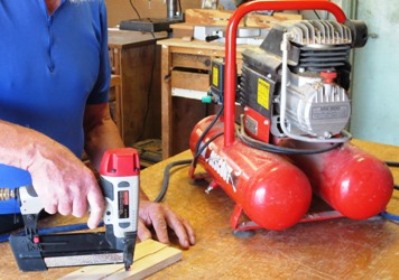
A nail gun powered by an air compressor
Tip: When using an air-powered nail gun, it is important to set the air pressure correctly. If the pressure is too low, the nail will not go in all the way and if it is too high, the nail can be shot through the material and cause injury.
Practice, Patience, and Personal Adaptations
Hammering is a practical skill that, with the right tools, techniques, and safety practices, is fully accessible to individuals who are blind or have low vision. Whether you’re tackling a small home repair or a larger woodworking project, the key to success lies in preparation, adapting techniques to suit your needs, and building confidence through experience. Everyone finds their own rhythm and preferred methods over time, so don’t be discouraged if it takes a few tries to find what works best for you. With patience and practice, you’ll be driving nails—and completing projects—with accuracy and confidence.
By Gil Johnson