Developing Balance and Strength if You are Blind or Low Vision
This content is also available in:
Español (Spanish)
Balance
Balance is where all physical activity begins. When a baby takes its first step, it has already started to master balance. We quickly take balance for granted once we get our bearings as children. We forget that it’s a skill that can diminish—as we discover as we age.
Some aspects of balance are automatic or reactive, while others are planned or anticipatory. Aging and vision changes can negatively impact both aspects of balance. Why? Because balance is affected by:
- your vision
- your ability to feel your feet and sense the position of your body in the environment or surroundings and
- your capacity to tell if you are really moving through space.
Vision is important to balance, yet vision is only one of the aspects involved. With practice, you can develop the other two aspects and their respective skills, such as developing strength, to compensate for vision changes.
Safety Tips: Five Basic Guidelines
- Do not begin any exercise without consulting your physician. Modifications may be necessary to exercise safely. Depending on your medical history or any medications you may be taking, conditions such as diabetes, glaucoma, macular degeneration, high or low blood pressure, heart disease, COPD, and many others must be considered when planning an exercise program.
- Do not exercise alone, especially when beginning a program, using new equipment, learning new movements, or in an unfamiliar environment. Exercising with a fitness professional or exercise partner ensures safety while providing motivation and boosting confidence.
- Begin slowly and choose an activity you’ll enjoy. Becoming discouraged is easy if your muscles are sore and you’re not having fun! But, if it hurts, STOP! Exercise and movement should not be painful. You might experience mild to moderate fatigue, muscle or joint awareness, or slight breathlessness. You should NOT feel any pain beyond what you may experience daily.
- Listen to what your body is telling you. It’s a pretty smart machine. If you are sore or exhausted, take a day off. If a particular movement causes discomfort or pain, find a substitute. Conversely, it is time to embrace a more active life if you can’t get out of a chair without help or climb a flight of stairs without becoming winded.
- Wear appropriate clothing and footwear. Comfort enhances motivation.
Developing Strength
You can start developing your strength by learning five movements, which you can practice at three different skill levels. In addition, you can work a few simple exercises into your everyday activities to develop your balance. As you proceed, remember, you’re not “working out,” you’re having fun moving those muscles around. As these movements become easier for you, remember to be creative, have a sense of humor, and be consistent.
The Five Movements
Practice each of these movements at the skill level appropriate for you.
1: Moving the Arms
A. Maintain the perfect posture described in Skill Level One.
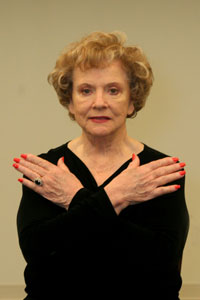
B. Place your arms in an “X” across your chest with hands touching opposite shoulders; hold that perfect posture and count to 20.
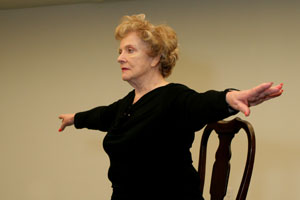
C. Hold your arms straight out from your sides at shoulder height. Count to 20.
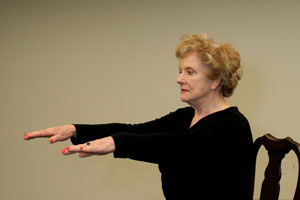
D. Hold your arms straight out in front of you (like a cartoon sleepwalker). Count to 20.
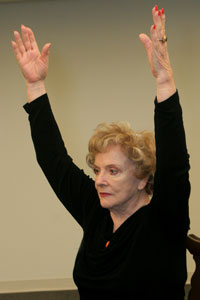
E. Hold your arms straight over your head. Count to 20.
F. Move your arms in an arc from a relaxed position by your side to over your head (like flapping your arms up and down as if you want to fly away). Do this ten times.
Two: Moving the Trunk
(That’s the part of your body below your shoulders and above your hips.)
A. Keep your feet on the floor, place your hands on your thighs, and check for perfect posture.
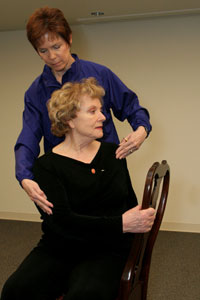 |
B. Turn to the right and then to the left slowly, rotating from the waist (this is like turning to shush the kids in the backseat of the car). Repeat 10 times. |
 |
C. Lean forward and back slightly, shifting your weight forward and back. Do this 10 times in each direction. |
 |
D. Lean to your right and then to your left, shifting your weight side to side, 10 times in each direction. |
Three: Moving the Feet
Remember your perfect posture and make sure your feet are about 8 inches apart.
A. Begin with your feet flat on the floor.
 |
B. Rock your feet back on the heels, raising your toes off the floor. Do this 10 times. |
C. Rock your feet forward on the toes, raising your heels off the floor. Do this 10 times.
D. Rock back and forward, alternately raising your toes and heals. Do this 10 times.
Four: Moving the Legs
Remember your perfect posture and make sure your feet are about 8 inches apart.
 |
A. March in place at a slow pace, alternately lifting one foot off the floor and then the other. Hum a marching tune. Count to 20.
|
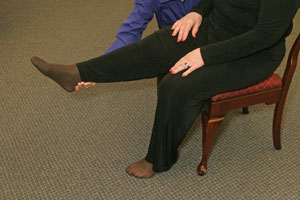
B. Straighten your left knee while leaving the right foot on the floor. Bend your left knee and lower the right foot back to the floor (this is a kicking motion like you are kicking whoever invented this program). Alternate legs, raising each leg 10 times.
C. Hold your right foot off the floor and circle your ankle 5 times in each direction. Repeat with the left foot off the floor.
Five: Moving the Hips
A. Keep that perfect posture, feet flat on the floor, 8 inches apart.
B. Circle your hips 10 times to the right and 10 times to the left (this is sort of like doing the hula).
C. Lift your right hip up toward your ribs and then lift your left hip (this looks like something you would see in belly dancing). Do this 10 times on each side.
The Three Skill Levels
Level One: “I’m Just Starting”
To set up this phase of balance practice, do the following:
 |
Sit on a stool or a on a chair with no arms. If you are in a chair, sit away from the back. |
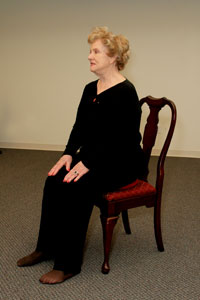
Or, for a bit more challenge, put a hard pillow or an inflatable disk on the seat of the stool. Your goal is to place yourself on a less stable surface. (To find out what an inflatable disk is, see Product Notes at the end of this article for more information.)
It is important to maintain perfect posture. Follow the recommendations pictured here:
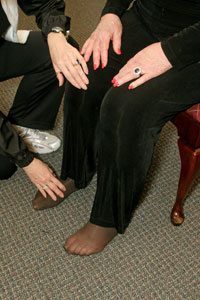
| A. Sit with your feet about 8 inches apart, flat on the floor. |
 |
B. Sit up tall. Pull your belly button in and up as you try to flatten your abdomen. |
 |
C. Tuck in your chin so that your ears are over your shoulders. |
 |
D. Pull your shoulder blades together ever so slightly. |
 |
E. Keep your eyes forward and chin parallel to the ground. |
F. Just hear your Aunt Margie say, “Sit up straight, young lady/man.” Your goal is to feel balanced and secure as you go through the five movements.
 |
G. Go through the five movements. Hold onto a chair, a stable piece of furniture or the wall for safety when you first begin. Be patient. This may be more of a challenge than you think. |
Level Two: “I’m Doing Pretty Well”
After you have mastered the movements at Level One, you may want to move the challenge up a notch. Progression is a great motivator! In order to further challenge all of those crazy balance systems we must create a more “unstable” practice situation. If you feel comfortable trying this, it can be accomplished in one of two ways:
 |
A. Practice each of the five movements while seated on a balance ball with or without a ball holder. (To find out what balance balls and ball holders are, see Product Notes). All of the movements are exactly the same. The progression comes from being seated on a more unstable surface. |
B. Practice each of the movements while standing—first with your feet at hip width (about 8 inches apart) and then with your feet close together.
Level Three: “By Jove…”
The key to progression is creating an even more challenging environment in which to practice these movements—but only if you feel comfortable. At this point, you will know most of the program by heart. Now, practice all of your favorite movements and your not-so-favorite movements in one of two ways (or both if you are feeling lively):
 |
A. Seated on a balance ball with an inflatable disk or foam under your feet. |
B. Standing on a foam mat or rocker board.
Everyday Balance Activities
Do the following two things every single day, and with very, very little effort, your sense of balance will improve.
In the Kitchen
A. Make a cup of hot tea, coffee, or hot chocolate.
B. While you wait for the water to heat, stand with one foot directly in front of the other like you are standing on a tight rope. Hold on to the cabinet at first and then try to let go and balance like a circus performer.
In the Bathroom
A. Brush your teeth.
B. While brushing your uppers, stand on your right foot only.
C. While brushing your lowers, stand on your left foot only.
D. Hold on to the cabinet at first and then try to let go and balance on one foot for as long as you can.
 |
When you start practicing the everyday balance activities, hold on to something for extra stability when you raise your foot. |
For More Information: Product Notes
The following items are listed in the article on balance.
 |
Inflatable Disk: An extremely versatile balance training tool that can be used in a wide variety of settings to address balance and joint stabilization. Compact and portable. |
Balance Pad: A thick round stability pad with an anti-slip, top-ribbed surface.
 |
Balance Balls: Used to improve balance, coordination, and quickness, and to heighten awareness of posture. |
These items (or similar ones) are available at most major retail fitness stores, as well as stores like Target or Wal-Mart. You can also order them from the following sites: